Sparkling Saturdays: Happy Wedding Autumn Edition

Welcome to another Sparkling Saturday! Today I will be sharing a fall themed wedding card with you that I made for a friend's wedding. Let's get started!

First, I used the largest rectangle from the small rectangle die set from Lawn Fawn to cut out my focal panel. Next, using my Cricut (or you can use any frame dies that you have!), I cut out some oval shaped frames from gold foil cardstock and black cardstock. Finally, I heat embossed some flowers and leaves from the SSS Summer Garden set using gold embossing powder and colored it in using my Kuretake Gansai Tambi watercolors and all my parts are now ready to be assembled! 


After the flowers and leaves had dried, I fussy cut them out and started to arrange my layout with all the other pieces. I finally settled on how I wanted my pieces to be places and started adhering them all them. I used some foam squares to adhere my flowers to give a bit of dimension. For my sentiment, I heat embossed it onto vellum using the same gold embossing powder. The sentiment is from Altenew Vintage Roses set.

For my finishing touches, I adhered this onto a premade silver foiled patterned card base, and added a scattering of gold and silver sequins throughout. After splattering on some gold and silver watercolor paint, my card was finished.

Hope you enjoyed! I will be entering this SSS Monday Challenge: Autumn.
Happy Crafting!

Sparkling Saturdays: Watercolored circles

Welcome to another Sparkling Saturday! Today I will be sharing with you a simple watercoloring and foil technique to make a simple birthday card. You can use any watercolors/water based markers that you have for this technique so it's very versatile. Grab your supplies and let's get started.

First, I cut a piece of Strathmore watercolor paper down to 4" by 5.5" for my focal panel. Next, I used a solid circle stamp from MFT Scribbled Flowers (but any circle stamp will do, or freehand!) to stamp on some circles. I used my Tombow markers to scribble on some color, misted it with some water, and stamped it onto my piece of paper. I repeated this step with multiple colors, not worrying about images that didn't stamp fully. After all my circles were stamped, I used my Pentel Aqua brush to go over the images to spread the color out.

After this piece was dried, I used my EK Success Powder tool to make sure my embossing powder wouldn't stick to areas I wouldn't want. Next, I used Versamark to stamp on my letters/sentiment using the Invisible Alpha set by Altenew. I heat set this with some clear embossing powder and then let it cool. For the final step, I placed some gold foil on top of my letters, and ran it through my laminating machine twice. When I pulled off the foil, not all the foil had adhered to the letters (probably due to the thickness and texture of my watercolor paper), but I liked this slightly distressed look, so I left it as it. If you don't like this look, you can always fill in the missing areas with the quickie glue pen, wait for it to get tacky, and adhere some foil on top. I adhered this to a yellow top folding card base, and this card was done!

Hope you enjoyed.
Happy Crafting!

Messy Mondays: Birthday Z-fold

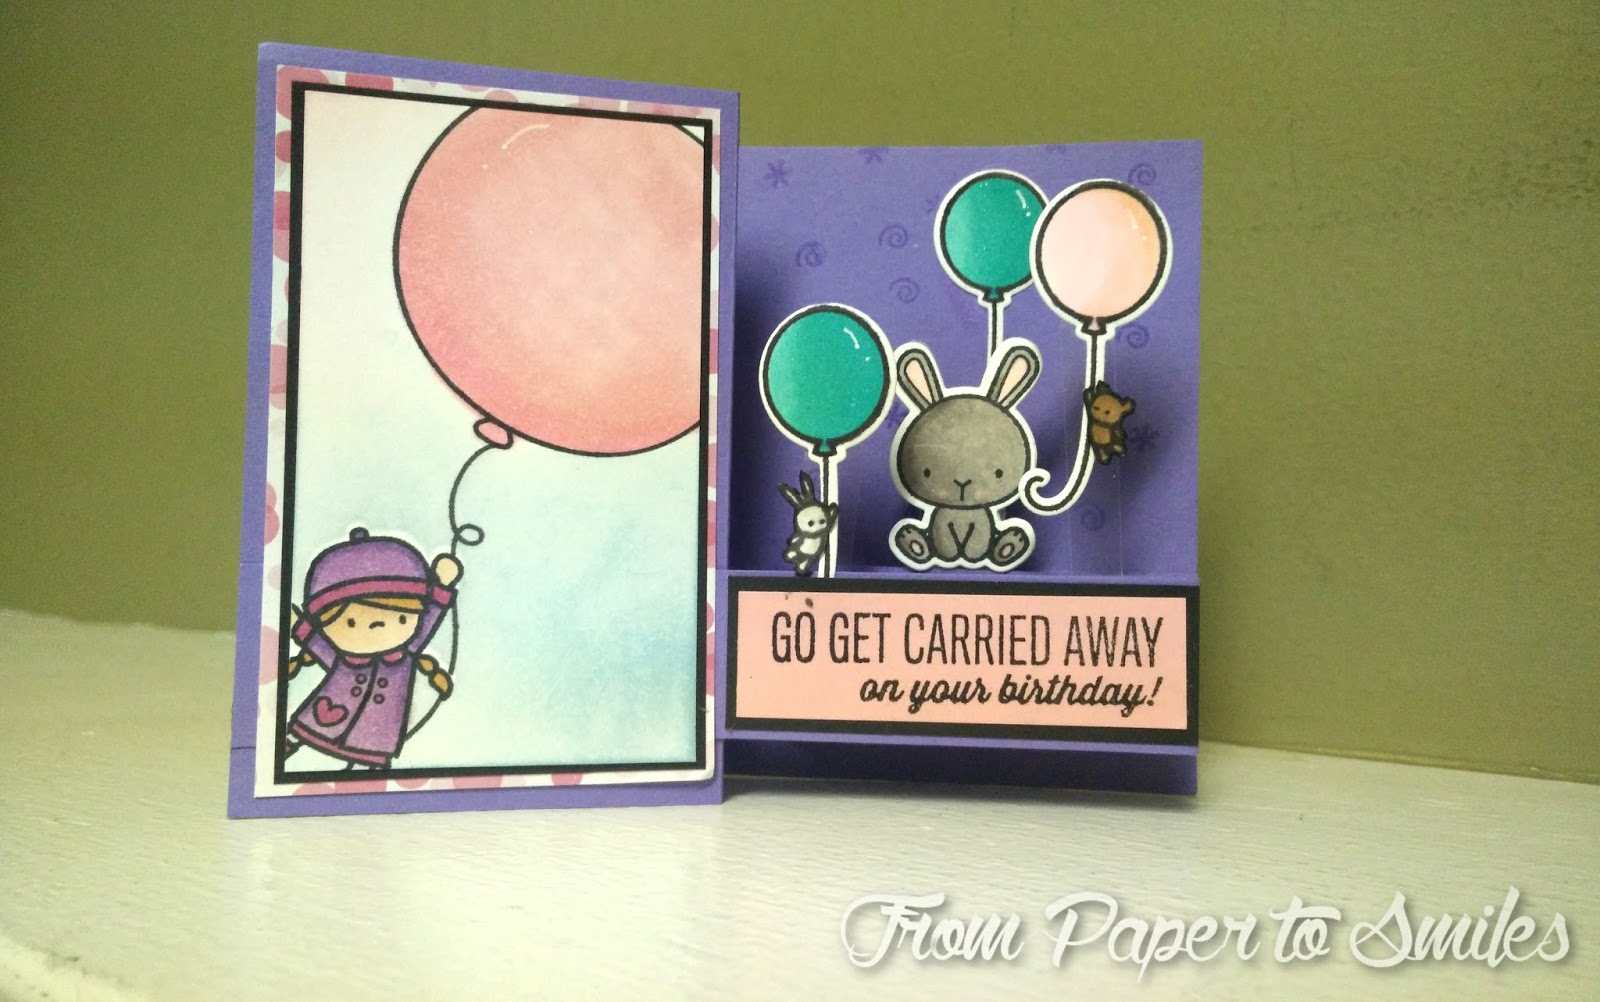
Welcome to another Messy Monday! Today I will be sharing with you a variation of the z-fold I made last May for mother's day (you can see it here). This version is a birthday version and I love this just as much as my other card. Which one do you like more? 

I started out with the basic base that you need for a z-fold card. If you google, "z-fold card tutorial", there a quite a few links out there with the measurements that you need. Let me know if you want me to make a write out my measurements, and I'll update this post later on! I made my card base out of the same purple cardstock that I used last time. 

For my images for this card, I decided to use some images from Mama Elephant Carried Away and Up & Away stamp set. For the focal panel, I made a mini picture using the stamps and blended on some Tumbled Glass distress ink for the sky, and colored in the images using Copics. After, I matted this onto a piece of black cardstock, which was then matted onto a patterned piece of paper before being adhered onto the card.

Next, I moved on to create the interactive images for my card. The cute bunny is from Mama Elephant Carnival Cupcake set and the balloons are from Lawn Fawn Party animal stamp set. I colored all the images in using various Copic colors and fussy cut/die cut them out. 

I adhered these images onto acetate strips that I cut out so that they would appear to be floating in the air. Since the bunny is symmetrical, I was able to perfectly adhere two bunnies together so that when you open the card and that image flips around, you would still be able to see the same bunny.

For finishing touches, I used Versamark ink to stamp on confetti from the same Lawn Fawn set, and stamped on some greetings using the sets from Mama Elephant. 

Hope you enjoyed! 
Happy Crafting.  

Sparkling Saturdays: Platinum Anniversary

Welcome to another Sparkling Saturday! Today I will be sharing a simple card that packs a big impact through the use of an embossing folder, selective ink rubbing, and heat embossing. Let's get started. 

This card was made for my grandparents who are celebrating their 70th anniversary (also called 'Platinum' anniversary!). Their love and care towards each other throughout all these years is something I definitely look up to. For this card, I decided to use an image of a couple on their wedding day so that it could remind them of how much they have experienced together since their own wedding day 70 years ago. First, I used a intricate wood mounted stamp from Micia Crafts (taiwan company) to stamp and heat emboss the image on a piece of red cardstock using Ranger gold embossing powder. I bought this stamp on my trip to Hong Kong in Feb, and I'm so glad this I decided to buy it even though it was slightly pricey. I love finding good quality stamps in other countries because they have quite a different selection than North American stamp companies.

After this image was embossed, I cut around the image, leaving a bit of a border. For my card base, I decided to use kraft colored card stock. For added interest and more impact, I used my WRMK Next Level embossing folder (geometric) to give it a 3D look. After it was dry embossed, I used my Delicata Gold pigment ink and rubbed lightly over the popped out areas to give it a sparkle and shine. Finally, I mounted the central image onto the cardbase using foam squares and this card was completed!

Hope you enjoyed!
Happy Crafting. 

Sparkling Saturdays: Sweet Birthday Shaker


Welcome to another Sparkling Saturday! Hope everyone in Canada is enjoying the Thanksgiving long weekend. I sure am! Today I will be sharing with you a shaker card I made for my friend's (who is also a crafter!) birthday.

I starting out by using dies from the Sew Fancy set by Mama Elephant and cut out a rectangle panel with a circle opening. I love the dot details that the circle gives, as this card adds subtle interest to the card. For my shaker portion, I used my WRMK fuse tool to make a pocket and filled it with different colored sequins.


Following this, I brushed on some purple on the background circle of my shaker panel using a stipple brush because I didn't want it to be stark white. Next, I used Calli Letters from Mama Elephant to stamp on the word 'sweet' and used some phrases from 'Happy Everything' for the rest. Finally, using a premade patterned card base, I adhered my shaker panel on.  Lastly, I stamped, colored, and fussy cut the cute bunny from Pix's Favorites and adhered it on the bottom middle of my shaker circle. For finishing touches, some sequins were added and the card was finished!

Hope you enjoyed.
Happy Crafting.